DIY radiant floor heating offers a unique and efficient way to warm your home, providing a cozy and comfortable living environment. This guide explores the intricacies of installing radiant floor heating systems, from understanding the different types to mastering the installation process. Whether you’re a seasoned DIY enthusiast or a curious homeowner, this comprehensive resource will empower you to embark on this rewarding project.
Radiant floor heating works by gently warming the floor surface, creating a natural and even distribution of heat throughout the room. Unlike traditional forced-air systems, radiant floor heating eliminates drafts and hot spots, promoting a more comfortable and healthy indoor climate. With a little planning and effort, you can enjoy the benefits of radiant floor heating in your own home.
Types of Radiant Floor Heating Systems

Radiant floor heating is a system that uses a network of pipes or wires to heat a room from the ground up. It is a highly efficient and comfortable heating system that is becoming increasingly popular for new and existing homes. There are two main types of radiant floor heating systems: hydronic and electric.
Hydronic Radiant Floor Heating
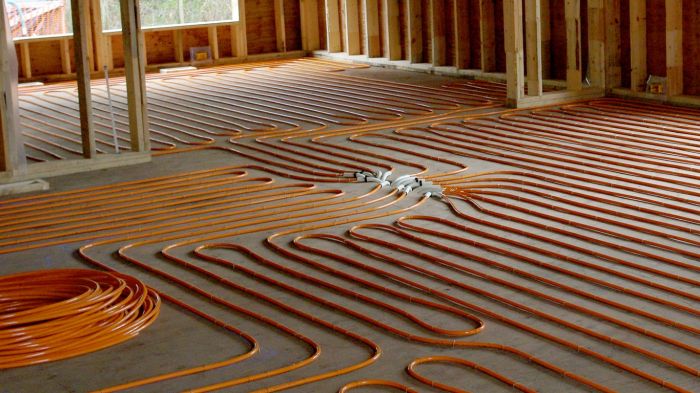
Hydronic radiant floor heating systems use water heated by a boiler to circulate through pipes embedded in the floor. The water transfers heat to the floor, which then radiates warmth into the room.
Hydronic radiant floor heating systems are known for their efficiency, comfort, and quiet operation.
Advantages of Hydronic Radiant Floor Heating
- High Efficiency: Hydronic radiant floor heating systems are highly efficient because they use water as a heat transfer medium, which is more efficient than air.
- Even Heat Distribution: Hydronic systems provide even heat distribution throughout the room, eliminating cold spots and drafts.
- Quiet Operation: Hydronic systems are very quiet because they do not use fans or blowers to circulate air.
- Comfortable Heat: Radiant heat feels more comfortable than forced air because it warms the room from the ground up, creating a more natural and even temperature distribution.
- Increased Floor Space: Hydronic systems do not require vents or ductwork, which frees up valuable floor space.
- Long Lifespan: Hydronic systems have a long lifespan, typically lasting for 20 years or more.
Disadvantages of Hydronic Radiant Floor Heating
- Higher Installation Costs: Hydronic systems are generally more expensive to install than electric radiant floor heating systems due to the need for a boiler, pipes, and installation labor.
- More Complex Installation: Hydronic systems require more complex installation than electric systems, which may require the expertise of a professional plumber.
- Potential for Leaks: Hydronic systems are susceptible to leaks, which can be difficult to detect and repair.
Common DIY Hydronic Radiant Floor Heating Kits
- Warm-Up Radiant Floor Heating Kits: These kits typically include a boiler, pipes, manifolds, and installation instructions. They are designed for both new and existing homes and can be used to heat a single room or an entire floor.
- Rehau Radiant Floor Heating Kits: Rehau is a well-known manufacturer of radiant floor heating systems. Their kits are known for their high quality and innovative features, such as their PEX pipes that are resistant to corrosion and leaks.
- Uponor Radiant Floor Heating Kits: Uponor is another leading manufacturer of radiant floor heating systems. Their kits are known for their durability and ease of installation.
Planning and Design Considerations
Planning and designing a DIY radiant floor heating system is crucial for ensuring efficient and comfortable heating. It involves careful consideration of factors such as the size and layout of the space, insulation, and the type of radiant heating system chosen.
Proper Insulation and Vapor Barrier Installation
Proper insulation and vapor barrier installation are essential for maximizing the efficiency and effectiveness of radiant floor heating systems. Insulation helps to prevent heat loss from the floor, while a vapor barrier prevents moisture from entering the subfloor and damaging the heating system.
- Insulation: Insulating the subfloor reduces heat loss and improves the overall efficiency of the radiant heating system. Common insulation materials for radiant floor heating include rigid foam boards, fiberglass batts, and mineral wool. The type and thickness of insulation will depend on the climate and the specific requirements of the project.
- Vapor Barrier: A vapor barrier prevents moisture from entering the subfloor and potentially damaging the radiant heating system. It should be installed between the subfloor and the insulation, creating a barrier that prevents moisture from migrating upward. Common vapor barrier materials include polyethylene sheeting, building paper, and moisture-resistant paint.
Heat Output of Different Radiant Floor Heating Systems
The heat output of a radiant floor heating system is a key factor to consider when planning a project. The heat output depends on the type of system used, the size of the space, and the desired temperature.
| System Type | Heat Output (BTU/hour per square foot) |
|---|---|
| Hydronic Radiant Floor Heating | 10-15 |
| Electric Radiant Floor Heating | 10-12 |
Note: These are general guidelines and actual heat output may vary depending on factors such as the specific system used, the installation method, and the climate.
Materials and Tools

This section Artikels the essential materials and tools required for a DIY radiant floor heating installation. These materials vary depending on the type of system you choose, but a general overview is provided here.
Radiant Floor Heating Tubing
Radiant floor heating tubing is the heart of the system, carrying heated water through the floor to warm your home. There are several types of tubing, each with its own properties and benefits.
- PEX Tubing: Cross-linked polyethylene (PEX) tubing is a popular choice for radiant floor heating. It is flexible, durable, and resistant to corrosion. PEX tubing is typically available in various sizes, with 1/2-inch being a common size for residential installations.
- Copper Tubing: Copper tubing is known for its excellent heat transfer properties and durability. It is also resistant to corrosion. However, copper tubing is more expensive than PEX tubing and can be more challenging to install due to its rigidity.
- PEX-Al-PEX Tubing: This type of tubing combines the benefits of both PEX and aluminum. The aluminum core provides excellent heat transfer, while the PEX outer layers offer flexibility and durability. This type of tubing is a good choice for applications where high heat transfer is required.
Other Materials
Besides the tubing, you’ll need other materials for your radiant floor heating installation.
- Manifold: The manifold is a central component of the radiant floor heating system. It distributes heated water to the individual loops of tubing. Manifolds come in various sizes, depending on the size of your system.
- Staples: Staples are used to secure the tubing to the subfloor. They are available in different sizes, depending on the thickness of your subfloor and the size of the tubing.
- Fasteners: Fasteners are used to secure the manifold to the wall and to connect the tubing to the manifold.
- Insulation: Insulation is important for preventing heat loss from the floor. You can use rigid foam insulation boards or a combination of rigid foam and fiberglass insulation.
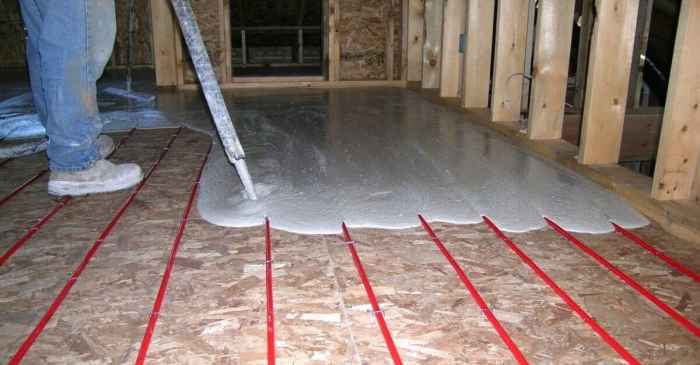
- Concrete: Concrete is used to cover the tubing and create a smooth surface for flooring. You can use a self-leveling concrete mix or a traditional concrete mix.
- Flooring: You can use any type of flooring over radiant floor heating, but some materials are better suited than others. Tile, wood, and laminate flooring are all good options.
Tools and Equipment
- Measuring Tape: You’ll need a measuring tape to measure the area of your floor and the length of tubing needed.
- Tubing Cutter: A tubing cutter is used to cut the tubing to the desired length.
- Tubing Bender: A tubing bender is used to create curves in the tubing.
- Staple Gun: A staple gun is used to secure the tubing to the subfloor.
- Screwdriver: You’ll need a screwdriver to install the manifold and connect the tubing.
- Level: A level is used to ensure that the manifold is installed level and that the tubing is laid evenly.
- Hammer: A hammer is used to drive in staples and fasteners.
- Safety Glasses: Safety glasses are essential for protecting your eyes from debris and dust.
- Gloves: Gloves protect your hands from cuts and abrasions.
Installation Process
Installing radiant floor heating involves laying down tubing or cables that carry heated water or electricity, respectively, beneath the floor’s surface. The installation process varies depending on whether you’re working with a concrete slab or a wooden subfloor.
Installation in a Concrete Slab
Installing radiant floor heating in a concrete slab requires careful planning and execution to ensure optimal heat distribution and efficiency.
- Prepare the Subfloor: Ensure the concrete slab is clean, level, and free from any debris or imperfections. This provides a stable base for the heating system.
- Install Insulation: Lay down a layer of insulation beneath the tubing or cables. This prevents heat loss to the ground below and improves efficiency. Common insulation materials include rigid foam board or extruded polystyrene (XPS) boards.
- Lay the Tubing or Cables: The tubing or cables are laid out in a pattern, typically in a serpentine or spiral design, to ensure even heat distribution across the floor. Spacing between tubing or cables depends on the desired heat output and the type of flooring being used.
- Secure the Tubing or Cables: Use staples, clips, or other appropriate fasteners to secure the tubing or cables to the insulation layer.
- Install a Moisture Barrier: A moisture barrier is placed over the tubing or cables to prevent water damage and ensure a dry environment for the heating system.
- Pour the Concrete Slab: Once the tubing or cables are securely installed, pour the concrete slab over the entire system. The concrete thickness should be sufficient to provide adequate support and thermal mass.
- Cure the Concrete: Allow the concrete slab to cure properly before applying any finishing materials. This typically takes several days to a week.
Installation in a Wooden Subfloor
Installing radiant floor heating in a wooden subfloor offers a more flexible and often less invasive approach compared to concrete slabs.
- Prepare the Subfloor: Ensure the subfloor is level, strong, and free from any movement or squeaks. This provides a solid foundation for the heating system.
- Install Insulation: Lay down a layer of insulation between the joists, creating a thermal barrier. This prevents heat loss and improves efficiency.
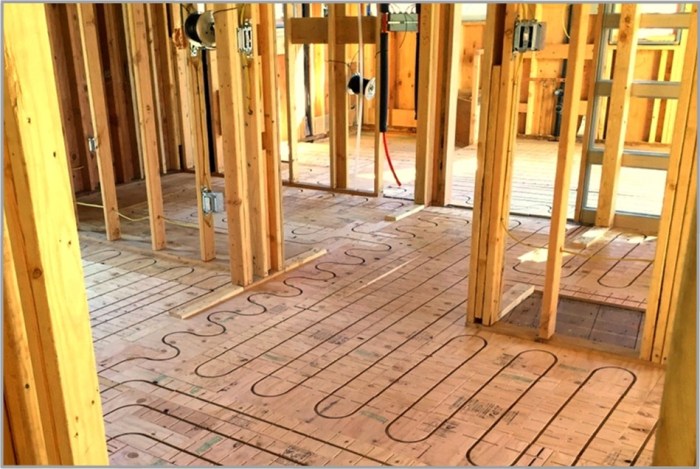
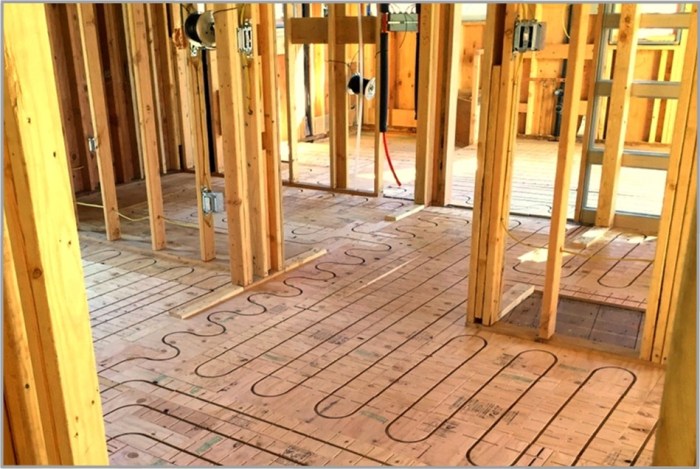
- Install the Tubing or Cables: The tubing or cables are laid out on top of the insulation, secured to the joists using staples or clips.
- Install a Moisture Barrier: Place a moisture barrier over the tubing or cables to prevent water damage and ensure a dry environment for the heating system.
- Install a Subfloor: Lay down a layer of plywood or other suitable subfloor material over the heating system. This provides a smooth surface for the final flooring installation.
Connecting the Heating System to the Thermostat
Connecting the radiant floor heating system to the thermostat is essential for controlling the temperature and ensuring proper operation.
- Select a Thermostat: Choose a thermostat specifically designed for radiant floor heating systems. These thermostats typically have features such as programmable temperature settings, zone control, and remote access.
- Connect the Thermostat Wires: Run thermostat wires from the thermostat to the heating system’s control panel. The specific wiring connections will vary depending on the system and the thermostat model. Refer to the manufacturer’s instructions for the correct wiring configuration.
- Install the Control Panel: The control panel houses the system’s components, such as the circulator pump, pressure gauge, and temperature sensors.
- Test the System: Once the installation is complete, test the system to ensure it is functioning correctly.
Cost and Budget
Radiant floor heating can be a significant investment, but it offers numerous benefits in terms of comfort, energy efficiency, and overall home value. Before embarking on a DIY project, it’s crucial to carefully consider the costs involved and ensure you have a realistic budget.
Cost Breakdown
Understanding the cost breakdown of a DIY radiant floor heating project is essential for making informed decisions. The cost of materials and labor can vary considerably depending on factors such as the size of the area being heated, the type of system chosen, and the complexity of the installation. Here’s a general breakdown of the potential costs:
- Materials: This includes the radiant heating mats or tubing, manifold, circulator pump, controls, and installation accessories. The cost of materials can range from $5 to $15 per square foot, depending on the type of system and quality of components.
- Labor: While you’ll be saving on labor costs by doing the installation yourself, you may still need to hire a plumber or electrician for certain aspects of the project, such as connecting the system to the existing plumbing or electrical system. The cost of labor can vary significantly depending on your location and the complexity of the project.
Cost Savings Compared to Hiring a Professional
DIY radiant floor heating can offer significant cost savings compared to hiring a professional installer. While the initial cost of materials may be similar, you’ll save on the labor costs, which can be substantial.
- Example: For a 1,000 square foot area, the cost of materials for a DIY radiant floor heating project could be around $5,000 to $15,000. Hiring a professional installer for the same project could cost an additional $5,000 to $10,000 or more in labor costs.
Energy Efficiency of Radiant Floor Heating
Radiant floor heating is known for its energy efficiency. Compared to traditional forced-air heating systems, radiant floor heating can be more efficient at heating a space, leading to potential savings on energy bills.
- Example: Studies have shown that radiant floor heating can be up to 20% more energy-efficient than forced-air heating systems, resulting in significant savings on heating costs over the long term.
Safety Considerations: Diy Radiant Floor Heating

Radiant floor heating systems, while efficient and comfortable, present certain safety considerations that must be addressed during the DIY installation process. It’s crucial to prioritize safety and follow all manufacturer guidelines to ensure a safe and functional heating system.
Electrical Safety
Electrical safety is paramount when working with radiant floor heating systems, as they involve electrical components.
- Always disconnect the power supply to the system before working on any electrical components.
- Ensure that all electrical connections are made according to the manufacturer’s instructions and local electrical codes.
- Use appropriate tools and equipment, such as insulated screwdrivers and wire strippers, to avoid electrical shock.
- Never work on electrical components while standing on wet surfaces.
- If you’re unsure about any electrical aspect of the installation, consult a qualified electrician.
Fire Prevention
Radiant floor heating systems can pose a fire hazard if not installed correctly.
- Ensure that all electrical wiring is properly insulated and routed away from heat sources.
- Use fire-resistant materials for insulation and underlayment.
- Follow the manufacturer’s recommendations for spacing heating cables and using appropriate thermostat settings to prevent overheating.
- Install smoke detectors and carbon monoxide detectors in accordance with local building codes.
- Inspect the system regularly for signs of damage or overheating.
Safety During Installation
- Wear appropriate safety gear, including safety glasses, gloves, and dust masks, when working with tools and materials.
- Use caution when handling sharp tools and materials, such as knives, saws, and staples.
- Be aware of potential tripping hazards during installation and ensure the work area is well-lit and free of obstructions.
- Take breaks to avoid fatigue, which can lead to mistakes and accidents.
Working With Heat, Diy radiant floor heating
- The heating cables can get hot during operation, so use caution when working near them.
- Allow the system to cool down completely before working on it, especially if you need to make adjustments or repairs.
- Keep children and pets away from the heating cables and system components.
Future Trends in Radiant Floor Heating
Radiant floor heating is a technology that’s been around for a while, but it’s constantly evolving. As technology advances, we can expect to see some exciting developments in the future of radiant floor heating, making it even more efficient, affordable, and user-friendly.
Emerging Technologies and Advancements
The future of radiant floor heating is bright, with several emerging technologies and advancements poised to revolutionize the way we heat our homes.
- Smart Controls: Radiant floor heating systems are increasingly incorporating smart controls, allowing for precise temperature adjustments based on room occupancy, time of day, and even weather conditions. These smart systems can be integrated with home automation platforms, enabling users to control their heating from anywhere with a smartphone or voice commands.
- Thin-Film Heating Elements: Thin-film heating elements are becoming more popular as a cost-effective and energy-efficient alternative to traditional radiant heating systems. These elements are significantly thinner and more flexible than traditional systems, allowing for easier installation and integration into various flooring materials.
- Wireless and Battery-Powered Systems: Advances in wireless and battery-powered technologies are making radiant floor heating more accessible for renovations and DIY projects. Wireless systems eliminate the need for complex wiring and allow for greater flexibility in installation. Battery-powered systems are ideal for areas without access to electrical wiring, such as decks or patios.
- Renewable Energy Integration: Radiant floor heating systems can be integrated with renewable energy sources, such as solar panels or geothermal heat pumps, to further reduce energy consumption and environmental impact.
Impact of Smart Home Integration and Automation
The integration of radiant floor heating with smart home systems is transforming how we manage our home comfort.
- Personalized Comfort: Smart home integration allows for personalized temperature settings in different rooms, catering to individual preferences and schedules. For example, a bedroom can be set to a cooler temperature at night, while the living room can be kept warm during the day.
- Energy Efficiency: Smart home systems can optimize heating schedules based on occupancy and weather conditions, reducing energy consumption and lowering heating costs.
- Remote Control: Smart home integration enables remote control of radiant floor heating systems, allowing users to adjust temperatures and monitor energy usage from anywhere with an internet connection.
Future Direction of DIY Radiant Floor Heating Solutions
DIY radiant floor heating solutions are becoming increasingly popular as homeowners seek cost-effective and efficient heating options.
- Simplified Installation: Manufacturers are developing user-friendly installation kits and tools, making it easier for homeowners to install radiant floor heating systems themselves.
- Modular Systems: Modular radiant floor heating systems are gaining traction, allowing for flexible installation and customization to suit different room sizes and layouts.
- Online Resources and Support: The availability of online resources, tutorials, and support communities is empowering DIY enthusiasts with the knowledge and confidence to tackle radiant floor heating projects.
Embarking on a DIY radiant floor heating project can be a rewarding and cost-effective way to enhance your home’s comfort and energy efficiency. By carefully planning, following installation guidelines, and taking necessary safety precautions, you can achieve a successful and satisfying outcome. Whether you opt for a hydronic or electric system, the warmth and comfort of radiant floor heating will transform your living space into a sanctuary of relaxation and well-being.
DIY radiant floor heating is a great way to add warmth and comfort to your home, but it can be a complex project. If you’re looking for a simpler DIY heating solution, you might consider installing a mini split DIY. While mini splits offer zoned temperature control, radiant floor heating provides a more even and comfortable warmth throughout the room, making it an ideal choice for areas like bathrooms and living rooms.

